Wednesday, June 24, 2015

Setup Wizard for Exchange Update Rollup ended prematurely

The issue is well-known, but I never got around to share it myself and just recently saw it once again at a customer, who experienced the problem.
This blog post will cover how to install and the Exchange Rollup Update successfully without getting the “Ended prematurely” error.
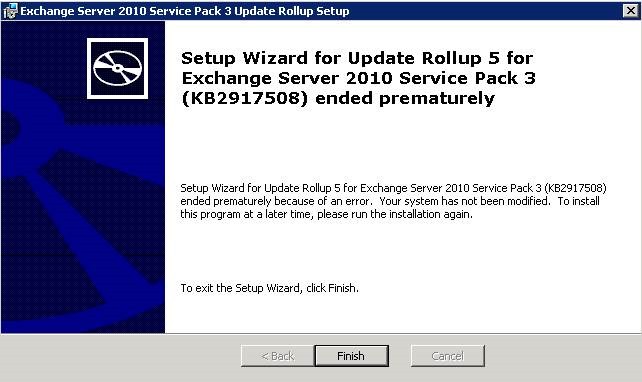
The Setup Wizard for Update Rollup fails with the error “ended prematurely”. It has been the same issue for Update Rollups for both Exchange 2007 and Exchange 2010.
The installer fails with the information:
Setup Wizard for Update Rollup 5 for Exchange Server 2010 Service Pack 3 (KB2917508) ended prematurely because of an error. Your system has not been modified. To install this program at a later time, please run the installation again.
The screen dump below also shows what error look like:
clip_image002
The reason for the error and why the Update Rollup installer is “ended prematurely” is because the server has User Access Control (UAC) activated on the server. For good reason, it is not recommended to disable the UAC.
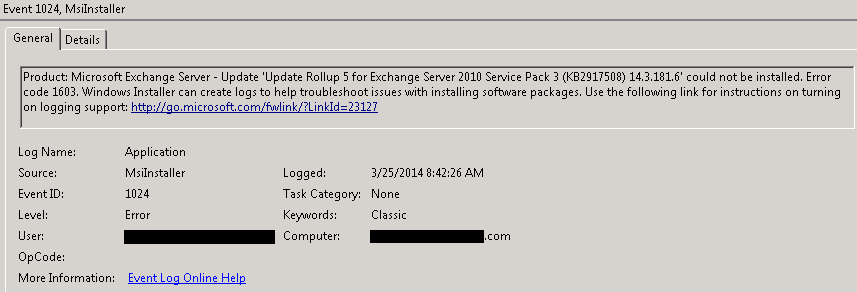
The error is also shown in the event log, as Event ID: 1024 and with error code 1603.
image

How to Install the Update Rollup

The recommended process for installing Update Rollups on the server, is using an elevated command prompt (Open a CMD with Run As Administrator) and make sure the Update Rollup is located on a local drive of the server and start the installer using:
SYNTAX example: msiexec /update <UPDATE .MSP FILE>
How to Start Setup Wizard:
msiexec /update Exchange2010-KB2917508-x64-en.msp
How to install the Update Rollup unattended (silent) add the following parameter (/quiet):
msiexec /update Exchange2010-KB2917508-x64-en.msp /quiet
Example as elevated command prompt starting the Update Rollup installer:
image
This will start the Setup Wizard and you can now walk your way through the installer and install the Update Rollup and when it has been installed, you should see the following:
clip_image002[8]

Other reasons for failing

The above is the most obvious reason for why the Update Rollup fails with “ended prematurely”, but if you see error codes 1603 or 1635 in the event log, there could be other reasons.

Monday, June 01, 2015

Allow IP in SMTP Replay Exchange 2013

In Exchange 2013, I am utilizing a multi-role server that has both the Client Access Server and Mailbox Server roles. We’ll want to head to the mail flow section in the Exchange Administration Center (EAC) that you can access by going to https://OWA.domain.com/ECP.
E15Relay02
Once in this mail flow section, we’ll click the tab called receive connectors which will allow us to see all receive connectors that exist.
E15Relay03
As you can see, there are connectors for FrontendTransport and connectors for HubTransport.  FrontEndTransport belongs to the Client Access Server Role and the HubTransport role belongs to the Mailbox Server role.
Let’s take a look at the “Default B-E15DAG1″ receive connector that belongs to the HubTransport role  as well as the “Default Frontend B-E15DAG1″ that belongs to the FrontendTransport role.
Taking a look at the “Default FrontEnd B-E15DAG1″, we can see that the connector listens on port 25 as we would expect.
E15Relay05
Taking a look at the “Default B-E15DAG1″ receive connector, we can see it listens on port 2525 which is something we haven’t seen before.
E15Relay04
All mail flow should come into the Frontend Transport which then delivers it to the appropriate mailbox server where the mailboxes exist.  On a multi-role server, these two roles cannot utilize the same ports as they are two different services.  What this means is, when creating a relay connector, this connector must be created on the Client Access Server role that owns the Frontend Transport because this service is the service that owns port 25.  If you try to create a receive connector on the Mailbox Server role that owns the HubTransport service, mail flow may work temporarily, but it will eventually fail due to both the FrontendTransport and HubTransport services fighting each other for port 25.  Obviously if the Client Access Server and Mailbox Server roles are on different servers, it’s not an issue.
To create our relay connector, we’ll choose the + symbol to create a new Receive Connector.
E15Relay06
Give the connector a name and be sure to choose Frontend Transport and Custom. Click Next.
E15Relay07
The default settings here are fine.  We want port 25 due to what I mentioned above. Click Next.
E15Relay08
In the remote network settings, it is important to ensure that you remove 0.0.0.0-255.255.255.255.  We want to explicitly define what servers are allowed to relay to ensure our server does not turn into an open relay for everybody.  In my case, I am going to add 192.168.50.2 which may be a printer, custom application, etc…  But the server that owns 192.168.50.2 would need to relay.  Once this is done, click Finish.
E15Relay09
Once the relay connector is created, open its properties, go to security, and make sure you check Anonymous Users.
E15Relay10
So what really happens when you place a check mark in the Anonymous users group in the above screenshot?  A lot of people are afraid to place a checkmark in that box in fear that anonymous users will be able to relay off your Exchange Server.  This is NOT the case.
When you place a checkmark in that box, the following permissions are given to the Anonymous Logon group:
  • Ms-Exch-SMTP-Submit
  • Ms-Exch-SMTP-Accept-Any-Sender
  • Ms-Exch-SMTP-Accept-Authoritative-Domain-Sender
  • Ms-Exch-Accept-Headers-Routing
So, as you can see, there is no Ms-Exch-SMTP-Accept-Any-Recipient permission added by default.  Because of this, users will NOT be able to relay off your Exchange Server by default.
To activate Anonymous users to use this connector for relaying, you must issue the following command: Get-ReceiveConnector “Receive Connector Name” | Add-ADPermission -User “NT AUTHORITY\ANONYMOUS LOGON” -ExtendedRights “Ms-Exch-SMTP-Accept-Any-Recipient”
The command should be easy enough to read, but what it essentially does is retrieve the receive connector that you created, add a permission into Active Directory for the Anonymous Logon group, and assign that group the Ms-Exch-SMTP-Accept-Any-Recipient permission for that group on that connector.  Once this is done, any server IPs you added to the Remote Network settings will be allowed to relay off your server utilizing port 25.
E15Relay11
Now you may be thinking, why should I create this new connector?  Well, Exchange will always look to see how specific you are on a connector.  So let’s say we have a SharePoint Server at 192.168.119.150.  We would create a relay connector and allow ONLY 192.168.119.150 to relay.  So when Exchange receives SMTP from an address of 192.168.119.150, it will see there are a few connectors.  One being the Default Receive Connector and one being the Relay Connector.  The Default Receive Connector allows connections from any IP Address while the Relay Connector only allows connections from 192.168.119.150.  Because you explicitly set the address on your Relay Connector, that is given higher preference in serving that SMTP connection from SharePoint and your SharePoint Server will now be able to relay off of Exchange (even though you can configure SharePoint to authenticate, but still just giving an example).
Now, for servers that will have a lot of relay traffic, there are some more steps you need to do on your Receive Connector.  If you see that you have mail flow issues where things periodically work with relaying and sometimes they don’t, it’s recommended to run the following commands on your Relay Connector.
Set-ReceiveConnector -identity “Relay Connector Name” -TarpitInterval 00:00:00
Set-ReceiveConnector -identity “Relay Connector Name” -ConnectionTimeout 00:30:00
Set-ReceiveConnector -identity “Relay Connector Name” -ConnectionInactivityTimeout 00:20:00
Set-ReceiveConnector -identity “Relay Connector Name” -MaxAcknowledgementDelay 00:00:00
Set-ReceiveConnector -identity “Relay Connector Name” -MaxInboundConnection 10000
Set-ReceiveConnector -identity “Relay Connector Name” -MaxInboundConnectionPercentagePerSource 100
Set-ReceiveConnector -identity “Relay Connector Name” -MaxInboundConnectionPerSource unlimited
So in my case, I would run the following command which would allow me to do Get-ReceiveConnector and pipe into Set-ReceiveConnector to make all the modifications in one command:
Get-ReceiveConnector -Identity “Relay Connector Name” | Set-ReceiveConnector -TarpitInterval 00:00:00 -ConnectionTimeout 00:30:00 -ConnectionInactivityTimeout 00:20:00 -MaxAcknowledgementDelay 00:00:00 -MaxInboundConnection 10000 -MaxInboundConnectionPercentagePerSource 100 -MaxInboundConnectionPerSource unlimited
E15Relay12
If you are wondering what the default settings were, I ran the following to view the defaults before running Set-ReceiveConnector.
E15Relay13

Wednesday, December 24, 2014

How to enable Ping in Windows Server 2012

GUI – Graphical User Interface
1. Open Control Panel, then select System and Security by clicking on that header

-
-
2. Select Windows Firewall

-
-
3. Advanced Settings

-
-
4. In ‘Windows Firewall with Advanced security’ click on ‘Inbound rules’

-
-
5. Scroll down to ‘File and Printer sharing (Echo request – ICMPv4-In)

-
-
6. Rightclick on the rule and select ‘Enable rule’

-
-
Make sure that it turns green

Done, close down the ‘Windows Firewall with Advanced Security’ windows and then the Control panel.
Verify functionality by pinging the servers own IP address from a command or PowerShell prompt.
Done!

-
-
PowerShell
(This will enable the existing rule exactly as the instruction above does)
Import-Module NetSecurity
Set-NetFirewallRule -DisplayName “File and Printer Sharing (Echo Request – ICMPv4-In)” -enabled True
 
EnablePing
(ABove enables the existing rule, below will create a new rule that allows ICMPv4/Ping and enable it)
Import-Module NetSecurity
New-NetFirewallRule -Name Allow_Ping -DisplayName “Allow Ping”  -Description “Packet Internet Groper ICMPv4″ -Protocol ICMPv4 -IcmpType 8 -Enabled True -Profile Any -Action Allow
 
EnablePing2
(For IPv6 Ping you obviously enable the v6 Inbound Rule…)
Thats all there is to it!

Monday, December 15, 2014

How to Delete Shadow Copies in Server 2008 R2


information   Information
Shadow Copies (Previous versions) are copies of files and folders created by Windows Backup when you back up your files, and copies of files and folders that Windows automatically saves as part of a restore point. When system protection is turned on, Windows will only automatically create previous versions of files and folders that have been modified since the last restore point was made.

This will show you how to delete shadow copies in Vista Ultimate, Business, and Enterprise editions, and all editions of Windows 7.

warning   Warning
Deleting a shadow copy will also delete the restore point it was part of.


BEFORE YOU START
To View Volume Shadow Copies Details

NOTE: You will need to do this first to know what drives/volumes letters you have shadow copies on, and for how much disk space the shadow copies use before continuing on to the options below. The example shadow copies below contain two restore points on drive C: , and two backups on drive F: .
1. vssadmin list shadows
NOTE: This command lists existing volume shadow copies, the time the shadow copy was created and its location. You need this to see and know the Shadow Copy ID needed in OPTION TWO and OPTION THREE below, and to see how many shadow copies are on each hard drive letter.
A) Open a elevated command prompt.

B) In the elevated command prompt, type the command below and press enter.
vssadmin list shadows

-shadows.jpg
2. vssadmin list shadowstorage
NOTE: This command lists the volume shadow storage space usage, the allocated space while a shadow copy is active and the maximum space that can be used. This is useful to see how much total space is being used on each hard drive letter by the shadow copies on it.
A) Open another elevated command prompt.

B) In the elevated command prompt, type the command below and press enter.
vssadmin list shadowstorage

Name:  shadowstorage.jpg
Views: 27937
Size:  133.0 KB
3. Set these command windows aside for easy reference when you do either OPTION ONE, OPTION TWO, or OPTION THREE below for what you would like to do to delete the shadow copies.


OPTION ONE
Delete Shadow Copies Using "Disk Cleanup"

NOTE: Disk Cleanup will delete all shadow copies and restore points saved to the selected hard drive letter except the most recent copy.
1. Open the Start Menu, type cleanmgr into the search box, and press Enter.

2. Select the drive/volume letter that you want to delete shadow copies on, and click on OK. (see screenshot below)
NOTE: You will not see this window unless you have more than one drive or partition on your computer.
Name:  DC-1.jpg
Views: 68341
Size:  28.8 KB
3. You will now see this screenshot below for a moment. (see screenshot below)
Name:  DC-2.jpg
Views: 26972
Size:  41.1 KB
4. Click on the Clean up system files button. (see screenshot below)
Name:  DC-3.jpg
Views: 27060
Size:  126.4 KB
5. If prompted by UAC, then click on Yes (Windows 7) or Continue (Vista)

6. Repeat steps 2 and 3.

7. Click on the More Options tab, and click on the Clean up button in the bottom System Restore and Shadow Copies section. (see screenshot below)
Name:  DC-4.jpg
Views: 26736
Size:  57.5 KB
8. Click on the Delete button. (see screenshot below)
Name:  DC-5.jpg
Views: 26779
Size:  55.0 KB
9. Click on OK. (see screenshot below step 7)

10. Click on the Delete Files button for the final confirmation. (see screenshot below)
Name:  DC-6.jpg
Views: 26725
Size:  35.3 KB
11. When the shadow copies and restore points are finished being deleted, Disk Cleanup will close.


OPTION TWO
Delete Shadow Copies Using "wmic shadowcopy delete" Command

WARNING: This option is for advanced users, and should not be tried by beginners.
1. Be sure you do the "BEFORE YOU START" section at the top first.

2. Open a elevated command prompt.

3. In the elevated command prompt, type wmic and press Enter. After a few seconds wmic:root\cli> will appear.
Name:  Shadow-1.jpg
Views: 26908
Size:  31.4 KB
4. Copy and paste the command below and press enter.
shadowcopy delete
5. You will now be asked Y/N for if you wanted to delete the available shadow copies one by one. Type your answer and press Enter after each one. (see screenshot below)
-shadow-2.jpg

Note   Note
The listed shadow copies that you answer Y/N to delete or not are referenced by their Shadow Copy ID number. You can compare this Shadow Copy ID number with the ones listed from step 1 in the "BEFORE YOU START" section to know for sure which one you are deleting or not.

For example, the Shadow Copy ID below for the one I deleted in step 5 above is the bottom shadow copy listed in my examples in step 1 of the "BEFORE YOU START" section for the C: drive. You can also compare the Shadow Copy Volume number between step 1 and step 2 in the "BEFORE YOU START" section for additional information about the shadow copy.

Shadow Copy ID
{1FAE1C7E-729C-4BE5-92D9-1FD643336AE1}

Shadow Copy Volume
{62027452-787d-11e0-8219-806e6f6e6963}


6. When finished, close all command prompts.


OPTION THREE
Delete Shadow Copies with "vssadmin delete shadows" Command

WARNING: This option is for advanced users, and should not be tried by beginners.

Note   Note
Only shadow copies that have the ClientAccessible type can be deleted using this command.

For example, if you look at my examples in step 1 in the "BEFORE YOU START" section, you will notice that only the C: drive/volume shadow copies have Client-accessible listed in their Attributes, and not the F: drive/volume shadow copies. This means that I can only delete the C: drive/volume shadow copies using this command. I would have to use OPTION TWO to be able to delete the F: drive/volume shadow copies instead.
1. Be sure you do the "BEFORE YOU START" section at the top first.

2. Open a elevated command prompt.

3. Do step 4, 5, or 6 below for how you would like to delete the shadow copies.

4. To Delete the Oldest Shadow Copy on a Specific Volume
NOTE: This can be handy if you have more than one shadow copy on a drive/volume letter, and wanted to only delete the oldest one.
A) Type the command below and press Enter.
NOTE: Substitute C: in the command below for the drive letter that you want to delete the oldest shadow copy in instead.
vssadmin Delete Shadows /For=C: /Oldest
B) Type Y or N to delete the shadow copy or not. (see screenshot below)
Name:  vssadmin-4.jpg
Views: 26636
Size:  47.9 KB
C) Go to step 7.
5. To Delete All Shadow Copies on a Specific Volume
A) Type the command below and press Enter.
NOTE: Substitute C: in the command below for the drive letter that you want to delete the oldest shadow copy in instead.
vssadmin Delete Shadows /For=C: /All
B) Type Y or N to delete the shadow copies or not. (see screenshot below)
Name:  vssadmin-5.jpg
Views: 26565
Size:  47.6 KB
C) Go to step 7.
6. To Delete a Specific Shadow Copy from Any Volume
A) Type the command below and press Enter.
NOTE: Substitute {Shadow Copy ID} in the command below with the actual Shadow Copy ID number of the shadow copy that you want to delete from step 1 of the "BEFORE YOU START" section.
vssadmin Delete Shadows /shadow={Shadow Copy ID}
For example, if I wanted to delete the 3rd shadow copy with the Shadow Copy ID of {ef4d4bbc-b569-4c1c-b8d3-a46af09e0ddf} in my example in step 1 of the "BEFORE YOU START" section, I would type this below.
Code:
vssadmin Delete Shadows /shadow={ef4d4bbc-b569-4c1c-b8d3-a46af09e0ddf}
B) Type Y or N to delete the shadow copy or not. (see screenshot below)
Name:  vssadmin-6.jpg
Views: 26474
Size:  51.2 KB
C) Continue on to step 7.
7. When finished, close all command prompts.
That's it,

Explaining DNS Concepts - DNS Servers-DNS Queries-DNS Records

3 types of DNS queries— recursive, iterative, and non-recursive 3 types of DNS servers— DNS Resolver, DNS Root Server and Authoritative Name...