Wednesday, October 29, 2014

.lnk File association issues/ all programs open in Notepad/Word

WordCuts [Fixed] Problem with Desktop Shortcuts (.lnk files) opening in wrong programThe other day I got a call from a  user who had somehow managed to make all his desktop shortcuts open in Word. I suspected he had used the “open With” option in the context menu; thus, telling Windows to “Always use this program to open these files”. The problem was clear. Even though each shortcut had the correct settings, Windows would still open them in Word. The problem is, you can’t just tell Windows to open the shortcut files in an other program than Word. You have to somehow Reset the shortcut behavior to factory settings.

So how did we fix it ?

NormalCut [Fixed] Problem with Desktop Shortcuts (.lnk files) opening in wrong programDoing some initial Googling (that’s a word now I believe) I came up with two solutions, where the first was to delete all .lnk references in the registry HKEY_CLASSES_ROOT and then import these from a different computer. Luckily I then found a much safer (and quicker) method, that actually works.
  1. Open Regedit
  2. Open Key folder:
    HKEY_CURRENT_USER | SOFTWARE | MICROSOFT | WINDOWS | CURRENT VERSION |EXPLORER | FILEXTS |.LNK
  3. Locate a sub folder named: User Choice
  4. Delete it
  5. Close RegEdit
  6. Reboot
Now all your shortcuts should be back to normal

How do I use Previous Versions /Shadow Copies?

How do I use Previous Versions?

This topic includes the following information:
What is the Previous Versions feature?
You can use Previous Versions to enable your users to access previous versions of their files and folders on your network. To enable access to previous versions of files, you must enable Shadow Copies of Shared Folders on the file server. Shadow copies are copies of files that are located on the server and appear as previous versions.
Once you enable Previous Versions, your users access this feature using the folder Properties dialog box. Available versions appear on the Previous Versions tab under Folder versions.
This feature is useful because users can:
  • Recover files that were accidentally deleted. If you accidentally delete a file, you can open a previous version and copy it to a safe location.
  • Recover from accidentally overwriting a file. If you accidentally overwrite a file, you can recover a previous version of the file. (The number of versions depends on how many snapshots you have created.)
  • Compare versions of a file while working. You can use previous versions when you want to check what has changed between two versions of a file.

Important

This feature is not a replacement for creating regular backups. Use a backup utility, such as Windows Server Backup in Windows Server 2008 or Windows Server 2008 R2, in coordination with Shadow Copies of Shared Folders and Previous Versions as your strategy for data protection.
Previous versions are read-only. You cannot make changes to a previous version of the file as it exists on the server. In addition, previous versions are periodically deleted and can disappear at any time. If you think you might want a previous version of a file, you should copy it to another folder so that it is not deleted.
How do I enable and configure Shadow Copies of Shared Folders to make Previous Versions available?
Shadow Copies of Shared Folders is a feature included in the Shared Folders Microsoft Management Console (MMC) snap-in. If you enable Shadow Copies of Shared Folders on a volume using the default values, a task will be scheduled to create shadow copies at 7:00 A.M.. The default storage area will be on the same volume, and its size will be 10 percent of the available space.
You can only enable Shadow Copies of Shared Folders on a per-volume basis—that is, you cannot select specific shared folders and files on a volume to be copied or not copied. Also, you should not use this feature to create shadow copies of files needed for the operating system to run properly.

To enable and configure Shadow Copies of Shared Folders

  1. Click Start, click Administrative Tools, and then click Computer Management.
  2. In the console tree, right-click Shared Folders, click All Tasks, and click Configure Shadow Copies.
  3. In Select a volume, click the volume that you want to enable Shadow Copies of Shared Folders for, and then click Enable.
  4. You will see an alert that Windows will create a shadow copy now with the current settings and that the settings might not be appropriate for servers with high I/O loads. Click Yes if you want to continue or No if you want to select a different volume or settings.
  5. To make changes to the default schedule and storage area, click Settings.
How do I restore a previous version of a file or folder?
Once you enable Shadow Copies of Shared Folders and start creating shadow copies, you can use the Previous Version feature to recover previous versions of files and folders, or files and folders that have been renamed or were deleted.

To restore a previous version of a file or folder

  1. Locate the file or folder that you want to restore, right-click the file or older, and click Properties. The Properties dialog box will appear.
  2. Click the Previous Versions tab, click the version of the file that you want to restore, and then click Restore. A warning message about restoring a previous version will appear. Click Restore to complete the procedure.
  3. Restoring a previous version will delete the current version. If you choose to restore a previous version of a folder, the folder will be restored to its state at the date and time of the version you selected. You will lose any changes that you have made to files in the folder since that time. Instead, if you do not want to delete the current version of a file or folder, click Copy to copy the previous version to a different location.

Additional considerations

  • If the Previous Versions tab does not appear in the Properties dialog box, Shadow Copies of Shared Folders might not be enabled on the shared resource. Shadow copies are copies of files that are located on the server and appear as previous versions.
  • If there are no previous versions listed, the file has not changed since the oldest copy was created—Previous Versions shows only the unique versions of the file.
  • When you restore a previous version of a folder, files in the current folder that were not contained in the previous version of the folder will not be deleted.
  • When you restore a file, the file permissions will not be changed—permissions will remain the same as they were before the restore operation. When you copy a previous version of a file, the permissions will be set to the default permissions for the directory (or folder) where the copy of the file is placed.
  • Restoring a large directory (or folder) puts a heavy load on the file server and can result in previous versions being deleted. Try to restore individual files instead of entire directories whenever possible.
  • Your server might function differently based on the version and edition of the operating system that is installed, your account permissions, and your menu settings.

Sunday, September 14, 2014

Analyzing a server 2008 R2 dwp crash dump file

Yesterday the four node file cluster resource crashed and blue screened and was moved to another node. I wanted to analyze the crash dump file (C:\Windows\Minidump\070711-36473-01.dmp) so I copied it to my W7 workstation and tried to open it but Visual Studio could not help me out here.
Reading a crash dump file is far from intuitive and I spent a great deal of the morning learning about debugging. So here is what I did to read the dump file.
First, you need to install the debugging tools from here. Choose the version that corresponds to your architecture. This install will take a long time depending on your network speed. Important is that you include the WinDbg.exe because that is the tool we will be using.
Next, you need to download the symbol files. Note that you can also use the symbol server from Microsoft but it is faster to have a copy of the symbol files on your hard drive. Download them here. Just download them all. And this will also take a long time because the Symbol files are huge.
Next! Open C:\Program Files\Debugging Tools for Windows (x86)\WinDb.exe.
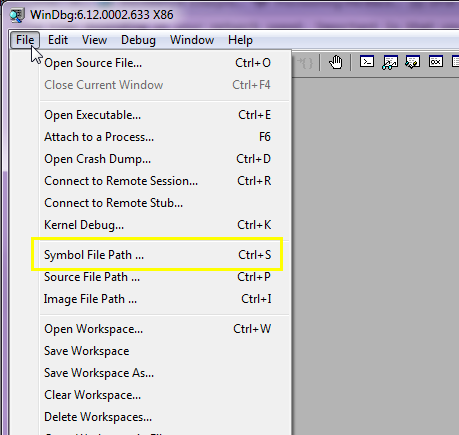
Choose File -> Open -> Symbol File Path

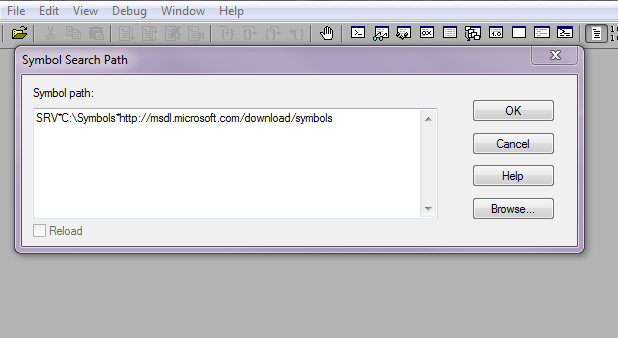
Type: SRV*C:\Symbols*http://msdl.microsoft.com/download/symbols like this:

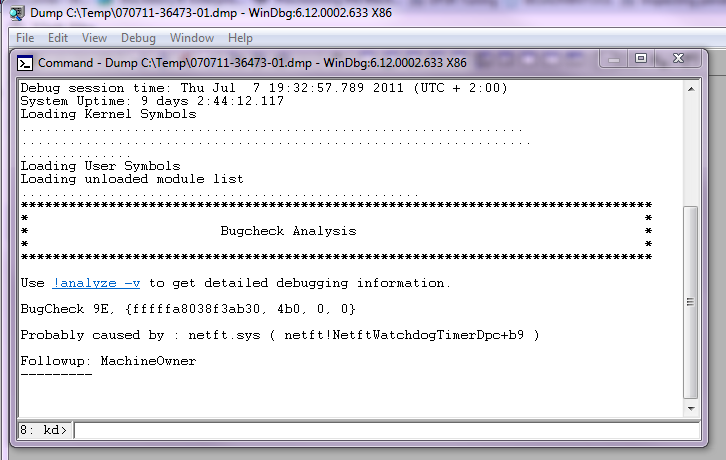
Now press CTRL+D to open the DWP file! Very exciting.

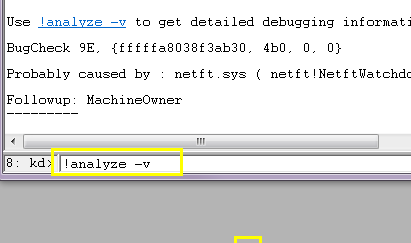
Now, if you enter !analyze -v like this:
And you’ll get more information about the crash. In my case:
8: kd> !analyze -v
*******************************************************************************
*                                                                             *
*                        Bugcheck Analysis                                    *
*                                                                             *
*******************************************************************************
USER_MODE_HEALTH_MONITOR (9e)
One or more critical user mode components failed to satisfy a health check.
Hardware mechanisms such as watchdog timers can detect that basic kernel
services are not executing. However, resource starvation issues, including
memory leaks, lock contention, and scheduling priority misconfiguration,
may block critical user mode components without blocking DPCs or
draining the nonpaged pool.
Kernel components can extend watchdog timer functionality to user mode
by periodically monitoring critical applications. This bugcheck indicates
that a user mode health check failed in a manner such that graceful
shutdown is unlikely to succeed. It restores critical services by
rebooting and/or allowing application failover to other servers.
Arguments:
Arg1: fffffa8038f3ab30, Process that failed to satisfy a health check within the
 configured timeout
Arg2: 00000000000004b0, Health monitoring timeout (seconds)
Arg3: 0000000000000000
Arg4: 0000000000000000
Debugging Details:
------------------
PROCESS_OBJECT: fffffa8038f3ab30
CUSTOMER_CRASH_COUNT:  1
DEFAULT_BUCKET_ID:  DRIVER_FAULT_SERVER_MINIDUMP
BUGCHECK_STR:  0x9E
PROCESS_NAME:  System
CURRENT_IRQL:  2
LAST_CONTROL_TRANSFER:  from fffff880030b76a5 to fffff80001a98d00
STACK_TEXT:
fffff880`0253d518 fffff880`030b76a5 : 00000000`0000009e fffffa80`38f3ab30 00000000`000004b0 00000000`00000000 : nt!KeBugCheckEx
fffff880`0253d520 fffff800`01aa4652 : fffff880`0253d600 00000000`00000000 00000000`40800088 00000000`00000001 : netft!NetftWatchdogTimerDpc+0xb9
fffff880`0253d570 fffff800`01aa44f6 : fffff880`030c4100 00000000`03023940 00000000`00000000 00000000`00000000 : nt!KiProcessTimerDpcTable+0x66
fffff880`0253d5e0 fffff800`01aa43de : 00000729`6e09a2ce fffff880`0253dc58 00000000`03023940 fffff880`02517d88 : nt!KiProcessExpiredTimerList+0xc6
fffff880`0253dc30 fffff800`01aa41c7 : 000001c5`99d9f3c1 000001c5`03023940 000001c5`99d9f3fd 00000000`00000040 : nt!KiTimerExpiration+0x1be
fffff880`0253dcd0 fffff800`01a90a2a : fffff880`02515180 fffff880`025202c0 00000000`00000000 fffff880`01368420 : nt!KiRetireDpcList+0x277
fffff880`0253dd80 00000000`00000000 : fffff880`0253e000 fffff880`02538000 fffff880`0253dd40 00000000`00000000 : nt!KiIdleLoop+0x5a
STACK_COMMAND:  kb
FOLLOWUP_IP:
netft!NetftWatchdogTimerDpc+b9
fffff880`030b76a5 cc              int     3
SYMBOL_STACK_INDEX:  1
SYMBOL_NAME:  netft!NetftWatchdogTimerDpc+b9
FOLLOWUP_NAME:  MachineOwner
MODULE_NAME: netft
IMAGE_NAME:  netft.sys
DEBUG_FLR_IMAGE_TIMESTAMP:  4a5bc48a
FAILURE_BUCKET_ID:  X64_0x9E_netft!NetftWatchdogTimerDpc+b9
BUCKET_ID:  X64_0x9E_netft!NetftWatchdogTimerDpc+b9
Followup: MachineOwner
---------
Explanation: USER_MODE_HEALTH_MONITOR (9e) is the bug check code I need to investigate. For a complete list of bugcheck codes look here: http://msdn.microsoft.com/en-us/library/ff542347%28v=VS.85%29.aspx
And now all that is left for me to say is: ‘happy debugging’.
Oh here are some helpful links: http://blogs.technet.com/b/askcore/archive/2009/06/12/why-is-my-2008-failover-clustering-node-blue-screening-with-a-stop-0x0000009e.aspx

http://blogs.msdn.com/b/ntdebugging/archive/tags/hangs/

Friday, July 11, 2014

Windows Server 2012 features

Opinion Microsoft's Windows Server 2012 is out. For many systems administrators, the question about this latest iteration of Microsoft's server family is not "What's new?" but "Why care?"
Server 2008 R2 is a great operating system, while Server 2012 bears the stigma of Metro and the Windows 8 controversy. But the answer to "why care" is simple: Server 2012 is as big a leap over 2008 R2 as 2008 R2 was over 2003.


Server 2012 comes with some great new features. It also refines previous versions of Server to bring it past the "never use version 1.0" stage and up to parity, in features and stability, with competing offerings.
In short Windows Server 2012 kicks ass. Here are the top 10 reasons why.

10. IIS 8

IIS 8 brings Internet Information Services up to feature parity with the rest of the world, and surpasses it in places. More than a decade's worth of "you use Windows as your web server" jokes officially end here.
IIS 8 sports script precompilation, granular process throttling, SNI support and centralised certificate management. Add in a FTP server that finally, mercifully, doesn't suck (it even has functional login restrictions) and IIS 8 becomes worth the cost of the operating system on its own.

9. PowerShell

PowerShell 3.0 is an evolution rather than a revolution. Having more PowerShell scriptlets is not normally something I would care about. That said, the 2012 line of products marks a revolution in Microsoft's approach to server management.
Every element of the operating system and virtually every other companion server, such as SQL, Exchange or Lync, are completely manageable through PowerShell. This is so ingrained that the GUIs are just buttons that call PowerShell scripts underneath.
PowerShell should be tops on this list but to make proper use of it, your Google-fu has to be strong. The official documentation is incomplete, Bing is still worthless for searching Microsoft's web estate and the golden examples for making use of PowerShell lie in the blogs maintained by Microsoft's staff.
Once you have assembled the list of scriptlets you need – printed, laminated and guarded by a fire elemental as in days of old – you can make the 2012 stack of Microsoft software sing. Thanks to PowerShell, Microsoft is ready to take on all comers at any scale.

8. DirectAccess

DirectAccess was a neat idea but it was poorly implemented in previous versions of Windows. Server 2012 makes it easier to use, with SSL as the default configuration and IPSec as an option. The rigid dependence on IPv6 has also been removed.
DirectAccess has evolved into a reasonable, reliable and easy-to-use replacement for virtual private networks.

7. Cluster Shared Volumes

With Server 2012 Cluster Shared Volumes are officially supported for use beyond hosting virtual hard disks for Hyper-V. You may now roll your own highly available multi-node replicated storage cluster and do so with a proper fistful of best-practice documentation.

6. Deduplication

For years now, storage demand has been growing faster than hard drive density. Meeting our voracious appetite for data storage has meant more and more spindles, and more controllers, chassis, power supplies, electricity and cooling to keep those spindles spinning.
Deduplication has moved from nice to have to absolute must in recent years and Microsoft has taken notice. Server 2012 supports deduplication on NTFS volumes – though tragically it does not work with CSV – and deeply integrates it with BranchCache to save on WAN bandwidth.

5. Hyper-V 3.0

Server 2012 sees Hyper-V catch up with VMware's mainstream. While objectively I would have to say that VMware retains the feature lead at the top end, when combined with System Center 2012, Hyper-V 3.0 will cheerfully handle two-sigma worth of use cases.
Microsoft is no longer an also-ran in the virtualisation space; it is a capable and voracious predator stalking the wilds of the data centre for new prey.
Microsoft's Hyper-V Server – a free Windows Core version of Hyper-V – is feature complete. If you have a yen to dive into PowerShell then you can run a complete 64-node, 8,000 virtual machine Hyper-V cluster without paying Microsoft a dime.
It takes a very special kind of masochist to do so – Microsoft is betting you will spend the money on System Center 2012 and it is probably right. System Center 2012 is amazing, even more so with the newly launched Service Pack 1.
Microsoft's focus on PowerShell and its decision to put price pressure on VMware with Hyper-V server has opened up a market for third-party management tools such as 5Nine. These are not nearly as capable as System Center, but offer a great mid-point between free and impossible to manage and awesome but too expensive. This emerging ecosystem should see Hyper-V's market share explode.

4. Hyper-V Replica

Hyper-V Replica is a storage technology designed to continuously replicate your virtual machines across to a backup cluster. It ensures that snapshots no more than 15 minutes old of your critical virtual machines are available over any network link, including the internet.
It replicates the initial snapshot in full – after that it sends only change blocks – and it fully supports versioning of your virtual machines.

3. iSCSI

With Windows Storage Server 2008, Microsoft first made an iSCSI target available. It eventually became an optional download from Microsoft's website for Server 2008 R2 and is now finally integrated into Server 2012 as a core component.

2. NFS 4.1

Microsoft's NFS 4.1 server is good code. Designed from the ground up it is is fast, stable and reliable. It makes a great storage system for heterogenous environments and a wonderful network storage point for VMware servers.

1. SMB 3.0

SMB 3.0 is the crown jewel of Server 2012. It is far removed from its laughingstock predecessor CIFS. It supports multiple simultaneous network interfaces – including the ability to hot-plug new interfaces on the fly to increase bandwidth for large or complex transfers – and supports MPIO, thin provisioning of volumes and deduplication (assuming the underlying storage is NTFS).
SMB 3.0 also supports SMB Direct and remote direct memory access, the ability for appropriately kitted systems to move SMB data directly from one system's memory to the other, bypassing the SMB stack. This has enabled Microsoft to hit 16GBps transfer rates for SMB 3.0, a weighty gauntlet for any potential challenger to raise.
I have found Server 2012 to be worth the cost of the upgrade, even where I have the excellent Server 2008 R2 deployed. Given that I work with very limited IT budgets, that is a strong endorsement.
If you have also taken the plunge, please share your take in the comments below

Monday, June 02, 2014

IIS -Internet Information Service Server Restart in 2008 Server


You might need to restart Internet Information Services (IIS) before certain configuration changes take effect or when applications become unavailable. Restarting IIS is the same as first stopping IIS, and then starting it again, except it is accomplished with a single command. There are two ways to restart IIS:
  • Using IIS Manager.
  • Using the IISReset command-line utility.
Both methods allow you to stop, start, and restart IIS Internet services. The Restart IIS command in IIS Manager and the IISReset command-line utility do not restart the HTTP protocol stack (HTTP.sys) or Internet services outside of IIS. In previous versions of IIS, restarting IIS using the IISReset command-line utility was a common practice for recovering from an unresponsive application.
Restarting or stopping IIS, or rebooting your Web server, is a severe action. When you restart the Internet service, all sessions connected to your Web server (including Internet, FTP, SMTP, and NNTP) are dropped. Any data held in Web applications is lost. All Internet sites are unavailable until Internet services are restarted. For this reason, you should avoid restarting, stopping, or rebooting your server if at all possible. IIS 6.0 includes application pool recycling and several other features that provide alternatives to restarting IIS. For a list of features designed to improve IIS reliability and remedy the need to restart IIS, see "Alternatives to Restarting IIS" in this topic.
noteNote
Changes to the metabase can be lost when restarting IIS. To avoid losing metabase changes and to trigger history files that back up the metabase, use the SaveData method. For more information about the SaveData method, see "SaveData" in the Platform SDK on MSDN.
With IIS 6.0, the World Wide Web Publishing Service (WWW service) lives in the service host, Svchost.exe. The FTP, NNTP, and SMTP services and the IIS metabase, known as the IIS Admin service, lives in Inetinfo.exe. If the IIS Admin service terminates abnormally, IIS restarts automatically. This feature is known as Automatic Restart. Previously, in IIS 5.0, if the IIS Admin service terminated abnormally, both the WWW service and IIS Admin service had to be restarted because they shared the same application space. In IIS 6.0, if the IIS Admin service terminates abnormally, the WWW service does not go down because the IIS Admin service and the WWW service run in separate process spaces. In this case, the WWW service acknowledges that the metabase has terminated abnormally and checks to see if the IISReset command-line utility is configured on the IIS Admin service. If IISReset is configured on the IIS Admin service, IIS waits for the IIS Admin service to start again and reconnects the WWW service.
All of the Internet services listed below, if installed, are affected when you restart IIS. Not all of the services listed below are installed by default.

Service
Description
IIS Admin service
This service manages all the services of IIS other than the WWW service (FTP, NMTP, and SMTP).
WWW service
This service provides Web connectivity between clients and Web sites.
HTTP SSL service
This service provides secure Web connectivity between clients and Web sites.
FTP service
This service provides FTP connectivity and administration through IIS Manager.
SMTP service
This service transports electronic mail across the network.
NNTP service
This service transports network news across the network.

ImportantImportant
You must be a member of the Administrators group on the local computer to perform the following procedure or procedures. As a security best practice, log on to your computer by using an account that is not in the Administrators group, and then use the runas command to run IIS Manager as an administrator. At a command prompt, type runas /User:Administrative_AccountName "mmc %systemroot%\system32\inetsrv\iis.msc".
Procedures
To restart IIS using IIS Manager
  1. In IIS Manager, right click the local computer, point to All Tasks, then click Restart IIS.
  2. In the What do you want IIS to do list, click Restart Internet Services on computername.
  3. IIS attempts to stop all services before restarting. IIS waits up to five minutes for all services to stop. If the services cannot be stopped within five minutes, all IIS services are terminated, and IIS restarts. In addition, clicking End now forces all IIS services to stop immediately, and IIS is restarted.
CautionCaution
If IIS is terminated before its services have stopped normally, data loss can result. If possible, back up your IIS configuration before restarting IIS. See Backing Up and Restoring the Metabase for information about backing up your IIS configuration.
ImportantImportant
You must be a member of the Administrators group on the local computer to run scripts and executables. As a security best practice, log on to your computer by using an account that is not in the Administrators group, and then use the runas command to run your script or executable as an administrator. At a command prompt, type runas /profile /User:MyComputer\Administrator cmd to open a command window with administrator rights and then type cscript.exe ScriptName (include the script's full path and any parameters).
To restart IIS using the IISReset command-line utility
  1. From the Start menu, click Run.
  2. In the Open box, type cmd, and click OK.
  3. At the command prompt, type iisreset /noforce computername, and press ENTER.
noteNote
The /noforce parameter is recommended as a safeguard against data loss in case the IIS services cannot all be stopped within the one minute timeout period. If you are certain that it is safe to force IIS to restart, you can omit the /noforce parameter. In addition, if you are logged on locally, the computername parameter is not required. If you are administering an IIS server remotely, the computername parameter is the NetBIOS name of the computer on which you wish to restart IIS.
  1. IIS attempts to stop all services before restarting. The IISReset command-line utility waits up to one minute for all services to stop. If the services cannot be stopped within one minute, all IIS services are terminated, and IIS restarts.
noteNote
You can adjust the timeout value using the iisreset /timeout command.
The IISReset command-line utility has several options available. For more information about the options available with the IISReset command-line utility, open a command-prompt window, and type iisreset /? You can also search for "iisreset" in Windows Help.
Automatic Restart
Automatic Restart is enabled by default for the IIS Admin service and WWW service. If a process within either service terminates abnormally, the service restarts automatically. The WWW service restarts using the net start command. The IIS Admin service restarts using the iisreset command. These commands are issued internally without user intervention. You can disable Automatic Restart using the following procedures.
To disable restart of IIS Admin service
  1. From the Start menu, right-click My Computer, and click Manage.
  2. In the console tree, expand the Services and Applications node, and click Services.
  3. Right-click IIS Admin Service, and click Properties.
  4. Click the Recovery tab, and in the First failure, Second failure, and Subsequent failures list boxes, click Take No Action.
  5. Click OK.
The following command can only be issued on the local machine.
To disable restart of IIS Admin service from the command line
  1. From the Start menu, click Run.
  2. In the Open box, type cmd, and click OK.
  3. At a command prompt, type iisreset /disable, and press ENTER. This command disables IIS and prevents all iisreset calls from executing.
noteNote
To re-enable the IIS Admin service, at the command prompt, type iisreset /enable, and press ENTER.
To disable restart of the WWW service
  1. From the Start menu, right-click My Computer, and click Manage.
  2. In the console tree, expand the Services and Applications node, and click Services.
  3. Right-click World Wide Web Publishing Service, and click Properties.
  4. Click the Recovery tab, and in the First failure, Second failure, and Subsequent failures list boxes, click Take No Action.
  5. Click OK.

Monday, April 28, 2014

How to Setup Exchange Server 2010


How to Setup Exchange Server 2010

Follow the steps below to correctly configure your Exchange Server 2010 email server for general use, and for use with IGetMail.  Note that for this document we are assuming you are installing Exchange 2010 on Windows Server 2008 R2 64 Bit.
  • Pre-Installation Checklist
    • Install Windows Server 2008 R2 64 bit version
    • Configure your static IP address
    • Activate Auto Updates
    • Add role - Active Directory Services
    • Add role - Active Directory Lightweight Services
    • Add feature - Windows Process Activation Service
    • Add role - Web Server (IIS)
    • Add feature - PowerShell
    • Enable TCP Port Sharing
    • Apply the 2007 Office System Converter
    • Roles / Features NOT to install
  • Installing Exchange Server 2010
  • Allow IGetMail access to your Exchange Server
  • Adding EMail Users
Pre-Installation Checklist
Make sure you have all of the following steps in place before you setup Exchange Server 2010 on Windows Server 2008 R2 64 Bit.
For simplicity we are assuming you are setting up a small office where one machine will be used for both the Active Directory and the Exchange Server. This setup works just fine and reduces the number of machines to maintain. If you have a larger office you may want to consider separating the Active Directory machine and the Exchange 2010 Server. 
Install Windows Server 2008 R2 64 bit version
Exchange 2010 is a 64 bit application and requires 64 bit versions of Windows Server 2003 or Windows Server 2008.  You should select a computer that is capable of running the 64 bit version of Windows Server 2003 or 2008.  For this example, we will start with a clean installation of Windows Server 2008 R2 64 bit version that has not had any roles installed.
After installing Windows Server 2008 R2 we set the clock and the name of the server to be "EX2010".  At this point this server is configured to be a stand alone computer with default settings.

Configure Your Static IP Address
The default installation of Windows 2008 sets your IP v4 and IP v6 addresses to use DHCP.  Since we will be configuring this computer to be a domain controller, you must change the IP address of the computer to be a static IP address.
To change your IP address, click on "View Network Connections" in the Server Manager screen.  This will display the list of active network interfaces.

Double click on your network adaptor to display the adaptors status.

Press the Properties button.

Highlight "Internet Protocol Version 4 (TCP/IPv4)" and then press the Properties button.

Change the radio button to "Use the following IP address" and enter an IP address you want to use for this server.  In our example, we chose to assign this server the internal IP address "192.168.1.25".  We also have a firewall appliance that operates as a gateway at the IP address "192.168.1.1". 
NOTE: It is important to include this computer in the DNS list.  You should list the IP address of this computer as the first entry in the list of DNS servers.  In the alternate DNS servers field, enter the IP address of a DNS server provided by your ISP.
Press OK to save your changes.
Now you will need to modify the support for IP v6.  If your network uses IP v6, then you will need to select "Internet Protocol Version 6 (TCP/IPv6)" , press the Properties button, then enter a static address.  If you are not using IP v6, you can leave the IP v6 set to the default setting of DHCP.
NOTE:  Exchange requires that IP V6 be enabled.  Even if you do not use IP V6 you must leave it enabled.  During the setup of Active Directory, the Active Directory Setup Wizard will check that both IP v4 and IP v6 have static addresses.  As long as the IP v4 address is static you can continue the installation.  DO NOT DISABLE IP V6 or else the Exchange Hub Transport Service will not start.
At this point you should have all IP addresses on this server configured as static IP addresses.  OR you have the IP v4 address configured as static and the IP v6 configured using DHCP.  Press OK to save your changes and close the Network Connection screen.
Activate Auto Update
The next step in making this server a Domain Controller is to activate auto update.  Active Directory will not install until this computer has auto updates active.  To activate auto updates, click on the link "Configure Updates" and then select the option to have Windows automatically install updates.   At this time Windows will download updates and will most likely need to reboot your computer.  Allow the updates to be applied and the computer to be restarted until all updates are applied before installing Active Directory.  You do not want to be in the middle of installing Active Directory when an auto update needs to reboot your computer.

Add role - Active Directory Services
The process of installing Active Directory consists of two steps:  the first step is to install Active Directory and the second step is to configure your Active Directory.  Once this is complete, your Windows Server will now be a Domain Controller.
Step 1 - Install Active Directory
At the Computer Management Screen, press the "Add Roles" link. 
At the Select Server Roles dialog, check/tick the option "Active Directory Domain Services".

When you select Active Directory the Select Server Roles Screen will inform you that you also need to install the feature ".NET Framework 3.5.1".  Press the "Add Required Features" button.

After acknowledging the required feature, press Next.
Active Directory Domain Services will present information about the changes it will make to your server.  Review this information and press Next.

Now the installation will scan your configuration and inform you if there are any pre-requisites that you have not fulfilled.  If the Active Directory Installation presents an errors, correct these at this time and then repeat the installation.  Once the Setup program indicates that you have met all pre-requisites, then press the Install button to start the installation process.

The setup program will now install Active Directory on your Server.

When the installation is complete, you should see a message indicating "Installation Succeeded". 
Press Close to return to the Server Management Screen.

Step 2 - Configure Active Directory
At the Server Management screen you should now see that you have 1 role installed.  The Active Directory Domain Services may indicate that it is installed but there are errors.  This is because the software is installed but not configured.

To configure Active Directory, click on the line under Roles labeled "Active Directory Domain Services".  The Server Manager will show you a page about the status of the Active Directory Role.

Click on the link "Run the Active Directory Services Installation Wizard (dcpromo.exe)".  When the Active Directory Domain Services Installation Wizard appears, press Next.

The Installation Wizard will present information about the version of Active directory, press Next.

Since we are assuming this Exchange Server will be the first Domain Controller, we choose "create a new domain in a new forest".  Press Next.

Enter the name of your domain.  The domain name you enter here is the domain name that Exchange will associated with all of your email.  If you use a hosting company to host your Internet Domain, then you may want to enter the name of your Internet domain with ".local".  If you host your own Internet Domain then you would enter your domain name here.
In our example, we are assuming that IGetMail.com is hosted at an Internet Hosting Company.  Since we do not host IGetMail.com on this Exchange Server, we will use IGetMail.local to indicate our internal domain for IGetMail. 
NOTE:  Once you enter your domain name it is very hard to change it in the future, so you should take great care when enter this name. 
Once you have decided on the name of your internal domain, that will be your Active Directory Domain and the domain serviced by Exchange, press Next.

The Installation Wizard will now ask you about compatibility.  If you plan to have domain controllers running various versions of Active Directory, then you will want to chose a function level to include the lowest version of Windows that you are using for domain controllers.  Press Next.

You will be asked a similar question which is at the domain level instead of the forest level on the previous screen.  You should follow the same approach and include the function level to include the lowest version of Windows you plan to use for domain controllers.  Press Next.

The first Domain Controller needs to have a DNS server running locally.  The optimal location is to start out with having the installation wizard install the DNS server locally.  Also, it will automatically make this computer a global catalog server.  Press Next.

You can specify where you want Active Directory to store its data.  If you only have one drive in your Server, then use the defaults.  If you have multiple drives, you can select which drive to use.  Press Next.

Should you need to restore Active Directory in the event of a hard drive failure, you will need to boot your Server into a special mode called "Directory Restoration Mode".  Should you need to boot your computer into this special mode, you will need to use a special password just for this restoration.  You can define this password at this time.  NOTE:  This password is different than the administrator account and if you change the administrator password this password will not change.  So you will need to store this password forever in a safe place.  Press Next.

Now the Installation Wizard will summarize the configuration that it is about to create.  To start the process of configuring your new Domain Controller, press Next.

The Installation Wizard will show its progress as it configures your Server.   This will take a long time.

When the installation is complete, you will be shown a final screen.  Press Finish.

Then restart your computer.
After restarting your computer, Windows should show you the Server Manager.  You should see on the Server Manager screen that you have Active Directory and DNS Server roles installed.  Also the process of installing Active Directory will add the features "Group Policy Management" and "Remote Server Administration Tools".

Add role - Active Directory Lightweight Services
Now that have your Server configured for Active Directory, Exchange requires that you add the Lightweight Service.  NOTE:  Exchange only requires that the Lightweight services are installed.  It does not require the Lightweight Services to be configured. 
Click on the link "Add Roles" and then select to add the role "Active Directory Lightweight Directory Services" and press Next.

The installation wizard will inform you that it will make the following modifications to your server.  Press Next.

The installation wizard will confirm your intention, press Install to begin.

The installation wizard will show its progress.

And finally when the role has been installed, the installation wizard will show its results.  Press Close and then proceed to configure this newly installed role.

At this point your Server Manager should show you that you have the Active Directory Lightweight Directory Services installed.  This is sufficient for Exchange.  If you want to create LDS instances you are welcome to, but that task is not required by Exchange.
Add feature - Windows Process Activation Service
The next feature that Exchange needs installed is the "Windows Process Activation Service".  To install this feature, click on the link "Add Features".

At the Select Features screen, check/tick the feature "Windows Process Activation Service". 
Select the items under this service and press Next.

Confirm your selections and press Install.  Windows will now install this feature and when it is complete, press Close to return to the Server Manager.

Add role - Web Server (IIS)
The next Role that Exchange needs installed is the Web Server IIS.  To install this role, at the Server Manager click on "Add Roles".

At the Select Server Roles screen, check/tick the role "Web Server (IIS)" and press Next.

The Web Server IIS installation will present information about what it will perform.  Press Next.

Exchange requires that several additional services be added to the default settings in IIS. 
In addition to the default settings, check/tick the following additional services:
  • Security - Basic Authentication
  • Security - Windows Authentication
  • Security - Digest Authentication
  • Performance - Dynamic Content Compression
  • Management Tools - IIS 6 Management Compatibility (include all items under this service)
Press Next.

The Web Server installation wizard allows you to verify your selections.  Press Install to begin.

The installation wizard will now install IIS on your Exchange Server.

When IIS is installed, press Close to return to the Server Manager.

Add feature - PowerShell
Now you are ready to install the next feature that Exchange requires as a prerequisite:  "Windows Power Shell".  At the Server Manager click on the link "Add Feature".

Select the Feature "Windows Power Shell" and press Next.

At the installation confirmation screen, press Install to begin the process of installing this feature. 
When the Power Shell feature is installed, press Close to return to the Server Manager.

We have just 2 more items to meet Exchange's Requirements.
Enable TCP Port Sharing
When you install Windows Server 2008, the default setup disables a service that is needed by Exchange.  You will need to enable this service.
At the Server Manager screen - expand "Configuration" in the left hand panel.  Then click on "Services".  The middle of the screen will show the installed Services.  Scroll to the Service named "Net.Tcp Port Sharing Service".

Right Click on the Service "Net. Tcp Port Sharing" and choose Properties.

Change the Startup from Disabled to Automatic.

Press OK to save your changes.
Apply the 2007 Office System Converter
You will need to download the 2007 Office System Converter Pack.  Click on this link to go to Microsoft's Download Site. 

Click on the link "Download Files Below".  Then press the "Download" button next to the File Name "FilterPackx64.exe".

Download and install the Filter Pack:

Press Next and proceed through the wizard.

When you have completed the Filter Pack installation you are now ready to install Exchange 2010.

Roles / Features NOT to install
Exchange has a requirement to use its own SMTP service and not the SMTP Role that is built into Server 2008.  As a result, you must not install the SMTP feature from the Server Manger.  This will be installed by Exchange.  Note that the Exchange Setup wizard will issue a warning that the SMTP services are not already installed, yet if you install the Windows 2008 SMTP feature, the Exchange Setup will consider that an error.
Installing Exchange Server 2010
You are now ready to install Exchange Server 2010. 
When you run the Exchange Server setup, the first 2 steps have been completed and will be inactive.  The next step you need to perform is to select the Language Option.  Click on "Choose Exchange Language Option".

Now select the language option that is appropriate for your environment.

After selecting your language option you are ready to being the installation. 
Click on the link "Install Microsoft Exchange."

The Exchange Server 2010 setup wizard will present information about the task it will perform, press Next.

Accept the license agreement and press Next.

You can choose to participate in error reporting if you wish, press Next.

Since this is Exchange Server is intended to be our only Exchange server, we will chose the typical installation which installs all of the components to make this Exchange receive, store and send email.  Select "Typical Exchange Server Installation" and press Next.

Enter the name of your organization, typically this corresponds to your company name or domain name.  Press Next.

If you intend to use Outlook 2003 clients to connect to this Exchange Server, then chose Yes to provide compatibility with these clients, then press Next.

Exchange will now ask what you want to specify for the Internet facing side of Exchange.  In our example, using IGetMail we would create the Internet facing side of Exchange as mail.igetmail.com.

Next Exchange Setup will ask if you want to join the Customer Experience Program. 

Exchange will now verify that all prerequisites are met.  If there are any items that Exchange needs, it will inform you at this time.  If the prerequisites have all been met, then press Install to begin the installation.

When the Exchange Server 2010 installation wizard completes, it will show the results of installing each component within Exchange Server.  You should see all components with a green check mark. 
Press Finish and your Exchange Server should now be ready to use.

When Exchange completes its installation, the Exchange System Manager will appear.  The Exchange System Manager will guide you through several post installation tasks.

Allow IGetMail access to your Exchange Server
IGetMail Version 3.x instructions:
When you are running IGetMail version 3.x you can instruct IGetMail to send email to your Exchange server using an authenticated user or anonymous access.
Authenticated User Access - With this method you instruct IGetMail to use a specific Exchange user account to connect to the Exchange Server.  Once connected through this account, IGetMail can send email to any of your Exchange user accounts.  In order to use this method, the Exchange user account must be a member of the Exchange Server Group within Active Directory.
To setup Authenticated Access:
  1. Open the Exchange Management Console
  2. Expand "Server Configuration"
  3. Select "Hub Transport"
  4. In the middle section of the Management Console you will see the list of Receive Connectors.

  1. Right click on the Receive Connector "Default ServerName" and choose Properties
  2. Select the "Authentication" tab.
  3. If you do not have an SSL certificate from a third party SSL provider, then Uncheck / Untick the option "Offer Basic authentication only after starting TLS".  By default Exchange will not allow users to authenticate until you have an SSL certificate.  Unchecking / Unticking "Offer Basic authentication only after starting TLS," allows Exchange to offer Authenticated login over standard SMTP.

When you configure IGetMail, you will need to specify a Windows user that meets these two requirements.
  • The Windows account must have a mailbox in Exchange
  • The Windows user must be a member of the group "Exchange Servers"
Commonly, the Administrator account does not work because it does not have a mailbox and a standard Windows account is normally not a member of the Exchange Server group.  To solve this you can either give the administrator a mailbox, or in our example below we created a Windows user, made this Windows user a member of the "Exchange Servers" groups, and then created a mailbox for the user.  In our example this new Windows user is named "IGetMail".
  1. Run Active Directory for Users and Computers.
  2. Select the Users group in the column on the left.
  3. Right Click and add a new user.  In our case we choose to name this new user "IGetMail" since we will use this Windows user account to route the email through as the email is delivered to all of the other users within Exchange.

  1. Select the Window user account that you want to have IGetMail use to connect to your Exchange Server.  Right click on the user name and choose Properties.
  2. Go to the "Member Of" panel.
  3. Press the Add... button.
  4. Add the Group "Exchange Servers" to make this Windows account a member of the "Exchange Servers" group.  This will grant this Windows account the rights to route email to other users.  This is needed for IGetMail to route email to your users.

Next we need to add a mailbox to the Windows account that IGetMail will use for authentication.
  1. Run the Exchange Management Console
  2. Expand "Recipient Configuration"
  3. Select Mailbox to show a list of existing Exchange Users
  4. Right Click on "Mailbox" under "Recipient Configuration" and select New Mailbox or Click on New Mailbox in the Actions Column on the right hand side.
  5. Add the Windows account that you want IGetMail to use to the list of Exchange users. In our example below we have added the account "IGetMail" to the list of Exchange Users.

Now Run IGetMail
  1. At the Status Panel, press the "Modify SMTP Settings" button.
  2. Check / Tick the option "Authenticate as - "
  3. Enter the Name of a Windows User Name that you want IGetMail to use to connect to the Exchange Server.  This Windows account must have a mailbox in Exchange and must be a member of the "Exchange Servers" group.

IGetMail is now configured to send email to your Exchange Server. 

To Setup Anonymous Access:
Anonymous access - With anonymous access you can allow anyone to send email to any of your users.  In this case, IGetMail only has to connect to the Exchange Server.  It does not need to log into a Windows Account.
To configure Exchange to allow any user to route email perform these steps:
  1. Open the Exchange Management Console
  2. Expand "Server Configuration"
  3. Select "Hub Transport"
  4. In the middle section of the Management Console you will see the list of Receive Connectors

  1. Right click on the Receive Connector "Default ServerName" and choose Properties
  2. Select the "Permissions Group" tab
  3. Check / Tick "Anonymous Users"
  4. Save your changes
  5. Now anyone can connect to the Exchange Server and route email to any user

IGetMail Version 1.x and 2.x instructions:
When you are running IGetMail Version 2.x and 1.x you need to allow anonymous SMTP connections for your server.
Method 1 - Run the Exchange Management Console.  Expand the Server Configuration and select Hub transport.  In the lower half of the screen under the tab "Receive Connectors" right click on the connect labeled "Default <Name Of Your Server>" and select Properties.  At the Properties for the default server select the Permissions Group tab.  At the Permissions Group Tab, check / tick the option Anonymous and save your changes. 
Method 2 - Run the following management shell command (note this is the Exchange Management shell and not the PowerShell):

Set-ReceiveConnector -Identity "Default <ServerName>" -PermissionGroups "AnonymousUsers"
Where you would replace <ServerName> with the computer name of this server.

Adding E-Mail Users
Run the Exchange Management Console.  Expand the item "Recipient Configuration" and select Mailbox.

Click on the option "New Mailbox" in the right hand panel under the Actions column heading.

Proceed through the wizard to create each of your new users.

Explaining DNS Concepts - DNS Servers-DNS Queries-DNS Records

3 types of DNS queries— recursive, iterative, and non-recursive 3 types of DNS servers— DNS Resolver, DNS Root Server and Authoritative Name...